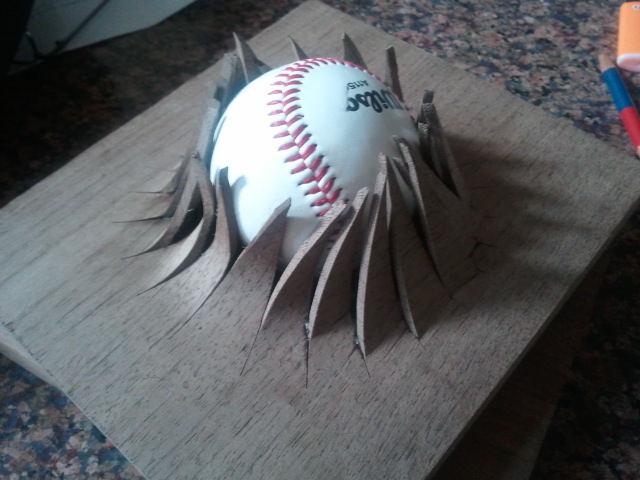
“Outta the Park!” Bent walnut and a baseball. Going to make a set of bookends along these lines. It’ll show the baseball entering on the left and exiting, as in this photo of a prototype, through the right. To make the walnut bendable in small dimensions, I hogged out much of the thickness beneath the tangs. I boiled it in water for about 20 minutes, then pressed it over a mounted trailer hitch ball and let it set for about an hour before removing it. Got very little spring back.
I’m new to the forum and glad to be here. Howdy, all, David Calof
4 Likes
Welcome to the forum. That looks amazing! Very creative, too. I can’t wait to see the finished product.
1 Like
WOW David…
that’s ingenuous and well done…
welcome to North West… Make yourself at home
Thanks a lot! I’m gonna like it here.
1 Like
Thanks, Tim. At the rate I work, that might be awhile!
1 Like
I hope it won’t be…
David, that is quite interesting. I have never seen anything like that before. Did it take more than one try to get it like the picture? The experiences I have had the few times I tried wood bending discouraged me. Good job!
Herb
Thank you. This was an honest, first attempt prototype, but I took several steps to ensure good plyability, and little spring back or breakage: 1. Making the tang material quite thin (as you can see in the photo) by hogging out the material underneath it before heating, and 2. forming/shaping the tangs (*) with a scroll saw before bending, 3. overdoing the heating a bit, 4. having my form truly ready and available because the thin tangs lose their heat quickly. That’s my secret sauce. Hope it helps.
David
- I hope to experiement with less uniform tangs in future versions. I like how the uniform ones look–they are different enough because of their various orientations–but I’d like to see how more jagged or irregular versions compare.
2 Likes
Thank you. Well, the good news is that I recently retired from a 60 + hour demanding job. Well, still working 8-10 hours a week, but that’s a snap after having been in the trenches for years. So, as these posts attest, I seem to be having more idle time to play with!
2 Likes
Oh, that must seem like a vacation to you, I say good, then we can see more of your unique and excellent ideas ,and workmanship.
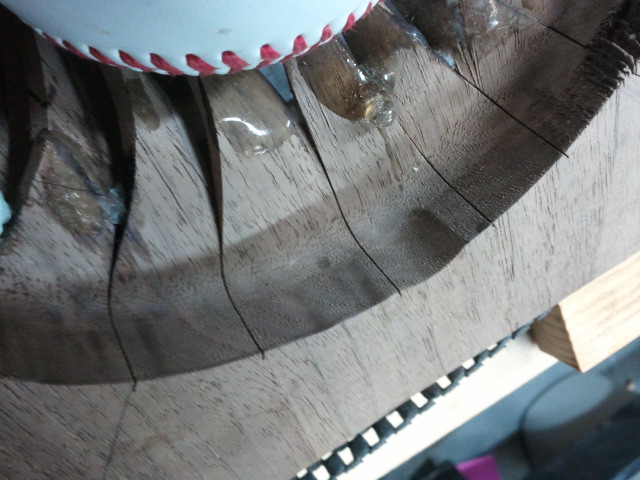
Is there a back on the piece to hold the ball in place?
Herb
1 Like
what method did you use??? Fostner bit???.. Router, template and mortise bit???.. Both???..
I’m not even close - am I???..
1 Like
Hi, David. Your project looks fun to work on! How thick you made the parts you bent? Can’t wait to see the bookends once they are done.
I took this course a while ago and have been playing around with ideas for my final project. Your trailer hitch method is creative and inspiring!
1 Like
Close, I used a bowl making router bit, then carved the sides to make them straight.
1 Like
Thank you. the only problem with the trailer hitch is that takes a lot of the heat from the wood. Next time, I will heat the hitch a bit. Show us your experiments with wood bending!
2 Likes
I epoxied the ball in place. Here is a view no one is suppoesed to see!
1 Like
dipping it in boiling water should work for that…
large diameter fostner bit???
they can be had to 4" diameters…
or…
a top bearing mortising bit (short length) is made for that job…
make a hole template and carve away…
https://www.freudtools.com/search?h=1
Great ideas. thanks. It’ll make the next one a lot easier