as the PDF says - Tame The tearout…
TAMING TEAR OUT.pdf (135.5 KB)
as the PDF says - Tame The tearout…
TAMING TEAR OUT.pdf (135.5 KB)
got big fingers and small nails/brads???
How to outsmart a nail.pdf (101.2 KB)
There is help for those warped boards…
A Method for Correcting Warps.pdf (945.8 KB)
get more from your bench vise…
Add a new dog to an old vise.pdf (191.3 KB)
need more wall space to hang stuff???..
this just may be the ticket…
sliders work out better and are easier…
either way make sure the shelving unit is anchored to the wall…
Adding Doors to Shelving Units.pdf (264.6 KB)
easier large piece laying out…
deal yourself a profile gauge…
to improve on this add another to the outfeed side of the planer…
Mill uniform widths with your planer.pdf (133.9 KB)
this isn’t limited to ¼"… most any size in single or multiples is doable…
for wide beads rip the dowel or flatten one side…
Put a bead in any board.pdf (104.8 KB)
need to do arcs and radii…
get the visual before you cut…
Drawing Bow.pdf (252.1 KB)
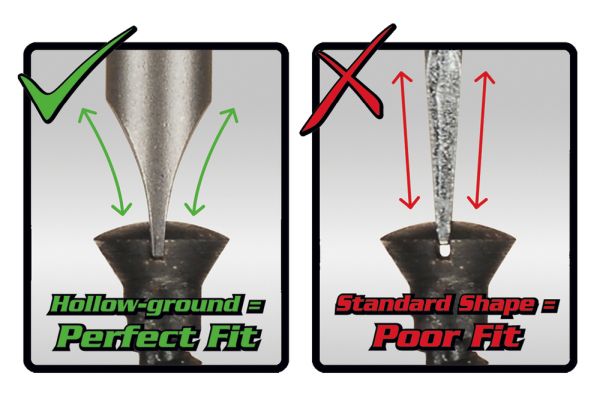
hollow grind your slotted drivers…
put that biscuit right where you want it…
Marking Guide Puts Biscuits in Right Place.pdf (100.9 KB)
T-Square Biscuit Joiner Jig.pdf (124.7 KB)
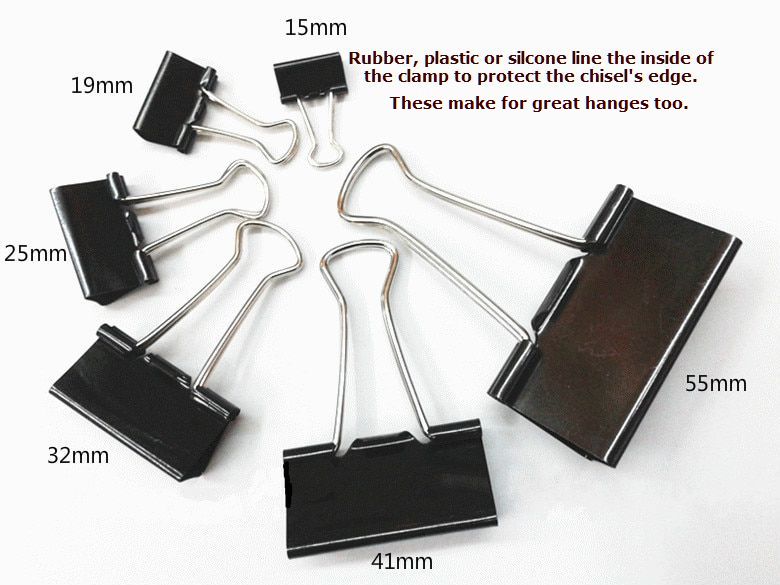
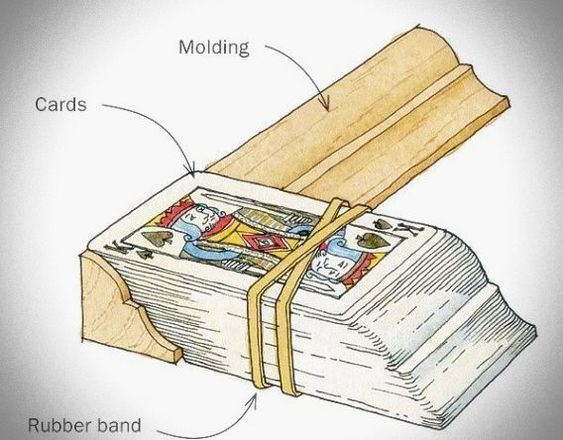
long work and the clamp you need isn’t in the inventory???..
Short Clamp for Longer Work.pdf (164.2 KB)
bring wax into your shop…
it’s some pretty handy stuff…
just remember - all wax is not created equal…
WAX V.2.pdf (39.0 KB)
Using Wax in the Shop.pdf (441.0 KB)
squaring up your work…
Double Error Squaring Method.pdf (68.2 KB)
Meeting the challenges of end grain,
Planeing…
no LA plane???..
make your lowest angle plane a bevel up plane to get a lower angle of attack…
works on a LA planes too to get an even lower cut angle…
the idea is to get your cutting angle down to 10~12° for optimum planeing end grain…
Note…
always use backer boards when planeing end grain…
END GRAIN PLANEING.pdf (104.0 KB)
Sanding…
this PDF covers it well…
Sanding end grain.pdf (27.9 KB)
Glueing…
When glue is applied to end-grain, the grain acts as little straws or a sponge w/ some woods and draws a lot of the glue up into the wood away from the joint starving the joint of glue. the majority of the glue is pulled away from the joint and (without more elaborate joinery techniques) a strong joint cannot be achieved, no matter how rough you sand or how tight your clamps are…
the fix is to size the end grain w your glue thinned by about 10%… give the thinned solution a moment or two to soak in and before it sets up add a coat of full strength and then assemble the joint…
Sizing…pdf (58.9 KB)
Unwanted darker end grain…
End grain is thirsty stuff. It soaks up water, oil and varnish much faster than side or long grain. When you’re applying a finish, it may soak up so much material that the surface turns quite dark.
In some cases, such as the end of through tenon or the ends of a dovetailed drawer front, that may not be such a bad thing. Contrast is good. But it’s not so good on the ends of a top or a crafted box. if you seal the end grain first before applying a finish, particularly an oil finish, it will help keep the end grain light…
The easiest sealer to use is shellac. You don’t need a very thick coat, a skosh will do. use a 1:1 blend of shellac and denatured alcohol. Apply the shellac only on the end grain…
as always, it’s best to experiment on scrap, first to see if it’s even necessary…
End grain rot…
Where does outdoor furniture rot first? On the end grain because of end grain’s thirsty nature which makes it the perfect breeding ground for rot promoting fungi… exposed end grain is most susceptible to rot and the ends of legs are at the top of the list for having it the worst…
to help prevent the legs from rotting, seal the ends with waterproof glue such as WeldBond, these are easier to use and clean up… apply glue to the end of each leg, let it soak in for a few minutes and then wipe off the excess. Repeat after about an hour and then add a glide and your legs will last much longer… your floors and deck will thank you…
Check Blade Alignment
When you crosscut a board, do you get burn marks? If so, your blade may be dull, or you are feeding into the saw too slowly, or your blade may not be parallel with the saw’s miter slots or the fence…
If your blade is out of parallel, the sides of the blade’s teeth, or even the body of the blade will rub against the end grain which creates friction and heat, resulting in burn marks that are very difficult to remove. If the fence isn’t parallel it’s either kanted into or away from the blade causing binding w/ the same burning results…
check your blade’s alignment… take a combination square and a piece of notebook paper. of course, first unplug your saw, raise the blade to full height and then back off a turn or so to release any induced tensions and kanting…
Place the square in one of the miter slots, holding its base tight against the blade side of the miter slot. Adjust the square so that its end just barely touches the blades body either at the front or back of the blade, but not on the teeth…
Slide the square back and forth along the miter slot a few times and watch what happens while maintaining firm pressure against the slot’s side… If you see a gap open up between the end of the square’s blade, then the blade isn’t parallel to the miter slot. (If you don’t see any gaps, then your alignment is OK.)
If you see a gap, the next step is to check the size of the gap… a piece of notebook paper will do just fine…a feeler gauge is best. The paper is about .003″ thick BTW… if the gap is larger than this, your saw definitely needs to be re-aligned consult your saw’s manual for instructions on how to make this right… If the gap is less than .003″ - the next step depends on what kind of saw you have. If it’s a cabinet saw, proceed with the realignment. If it’s a contractors saw or a hybrid saw, leave well enough alone. While not impossible, it’s very difficult to align this type of saw to a tolerance less than .003″.
there is also a possibility the blade is bent or kinked (the fix here is a blade change) or there may be saw dust under the arbor’s washers holding the blade at a kant… look into these possibilities before you start tearing into your saw…
one other thing, the blade could be cupped from over tightening…
Take Small Bites (router)
You’ve seen “Maintain Speed” signs on highways and in tunnels, right? Well, you might as well have one posted on your router too. If you slow way down or stop while routing/cutting end grain, there’s a good chance the bit or blade will burn the wood.
Some species of wood are more prone to this problem than others. Cherry, one of our premier hardwoods, is notoriously susceptible to burning. add maple and white oak to the list…
By maintaining speed, I don’t mean that you have to move at a fast clip. Slow and steady is fine but not too slow. firmly easy does it w/o lingering or stopping…
The best way to maintain a steady rate of feed is to avoid hogging off too much wood in one pass. Rather than rout a full profile in one pass, take it in stages. If you’re using a handheld router and a bit with a bearing, adjust the height of the bit so your first pass doesn’t take off too much wood.
Rout all the way around your workpiece, then lower the bit 1/32″ or 1/16″. Rout all the way around again, and repeat the procedure until you’re with 1/64″ or so of the full profile. Make the final adjustment and take a light cut all around. Spending a little more time routing will save a lot of time sanding.
the amount of material you take off in one pass is also relative to how much router you have be it a 1, 2 or 3HP, the quality of the bit, flute count and it’s sharpness…
as in bargain basement bit compared to a Freud QuadraCut…
again… experiment to find what works best…
Note…
if you are getting fine saw dust during your routering operation you are either feeding/going too slow, too shallow or the bit is dull… it could be the bit just needs a cleaning and/or dressing… you are looking to get flakes instead of dust… the flakes/chips help remove heat from the cut as where dust doesn’t do that anywhere as well…
piece too think and not enough saw???
Cutting Thick Parts.pdf (301.5 KB)
squeeze a little more from your hand saws…
Handsaw Tricks.pdf (146.6 KB)
organizing those plastic bins made a little easier…
Wire Shelving for Storage-Bin Support.pdf (137.9 KB)